What you will learn
- Understand what a GPS track is and what a GPX file is for.
- Record a route with your phone, or reuse the one from a hiking app.
- Know how the photos place themselves along the route.
- Make the video and the summary page, then send them.
Module 1
Understand GPS tracks
A track: a string of points
Your phone constantly listens to satellites and works out its position to within a few metres: that is GPS. A track is nothing more than a list of those positions, noted one after the other as you move: a point every few metres, with the time and often the altitude.
Join the points and you get the line of your route on the map. Add up the gaps and you get the distance. The difference between the first and the last time gives the duration, and the altitudes give the climb, that is, how much you went up. The trip journal works all this out as soon as it receives a track.
The GPX file, a common language
To move a track from one app to another, there is an open format: GPX. It is a plain text file that contains the list of points. Almost every hiking, cycling or running app can export it: Komoot, Strava, Visorando, OsmAnd, Garmin Connect, Geo Tracker. Look for “Export” or “Share” in the menu of a recorded outing.
The trip journal also reads KML (Google Earth) and GeoJSON files. And if you have no app at all, it can record the route of a stroll itself, then give you the GPX file to keep.
How a photo finds its place
Every photo keeps, hidden in the file, details written by the camera: the date, the time to the second, sometimes the position. They are called EXIF data.
The tool uses them like this: it reads the time of the photo, then looks in the track for where you were at that moment. The photo lands at that spot on the route, with nothing for you to enter. If the time matches no moment in the track, it tries the position written in the photo. As a last resort, it spreads the photos in order.
On a phone, the clock sets itself: it just works. With a separate camera, check its clock before you leave.
Everything happens on your device
The track and the photos are read by your browser. The map, the video and the summary page are made on your phone or computer: nothing is sent to our server. So that you find your journal again when you come back, it is kept in the browser until you choose “Clear everything and start again”.
Only one thing can come from outside, and only if you ask for it: the map background. Without it, the route is drawn on a plain background. With it, the map images are loaded from OpenStreetMap, a free map made by volunteers, which then receives your IP address and the area shown.
Key takeawayA GPS track is a list of timed points. The time of your photos is what places them on the route: you have nothing to write down during the outing.
Words to know
- GPS
- Satellite system that lets a phone know its position to within a few metres.
- Track
- List of the positions noted during a journey, with the time and often the altitude of each point.
- GPX
- Open file format that contains a track. Hiking and sports apps can export it.
- Climb
- Total height gained along the route, in metres.
- EXIF
- Details written by the camera into each photo: date, time, sometimes position.
- Map background
- Picture of the map (roads, forests, villages) shown under the route. Here, the optional one from OpenStreetMap.
- MP4
- Video format played by every phone, computer and messaging app.
Module 2
Make your trip journal step by step
Record the route with the page
- Open the trip journal on your phone.
- In the step The route, in the block “Record the route with this page”, tap Start and allow location.
- A dark screen opens: the route screen.
- It shows the distance and the stopwatch in large type.
- Take a photo opens the camera and stores the picture in the journal.
- Do not lock the phone: after twenty seconds the screen goes dark by itself and the route keeps recording (press and hold to wake it).
- Pocket mode does the same straight away.
- When you arrive, keep your finger on Hold to stop.
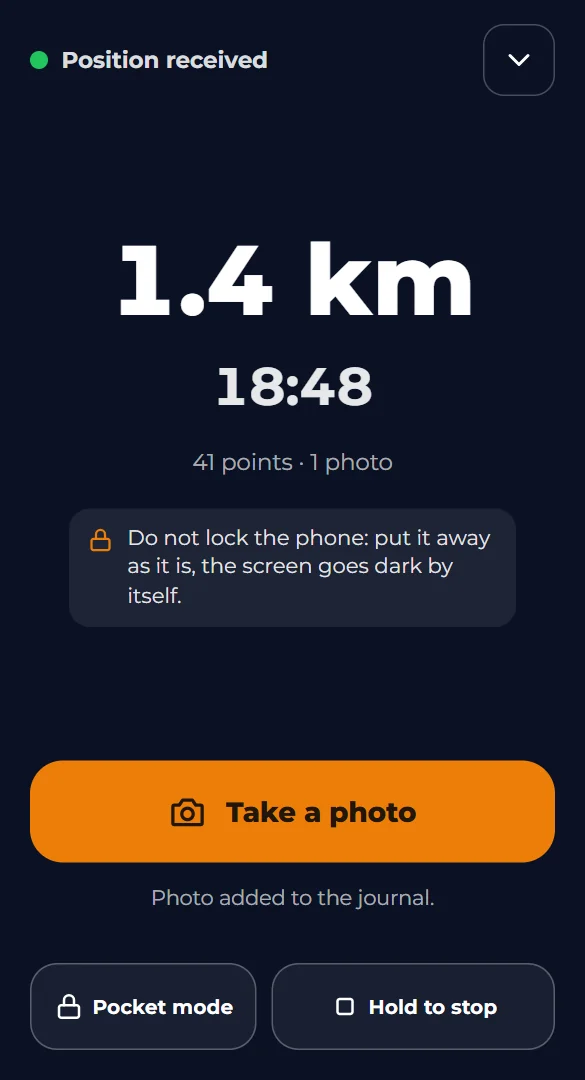
Screenshot : Trip journal TipThe page must stay open: if the phone is locked, the route is no longer tracked and that stretch shows as a dotted line. Perfect for a stroll. For a full day's walk, record with a hiking app instead.
Or give the track from an app
- Did you record the outing with an app?
- Export it as GPX, then tap Choose a track (GPX) and select the file.
- The route appears on the map.
- At the top of the step, the tool sums up what it has read: the name of the route, the distance, the time and the metres of climbing.
- “Remove this track” lets you choose another one.
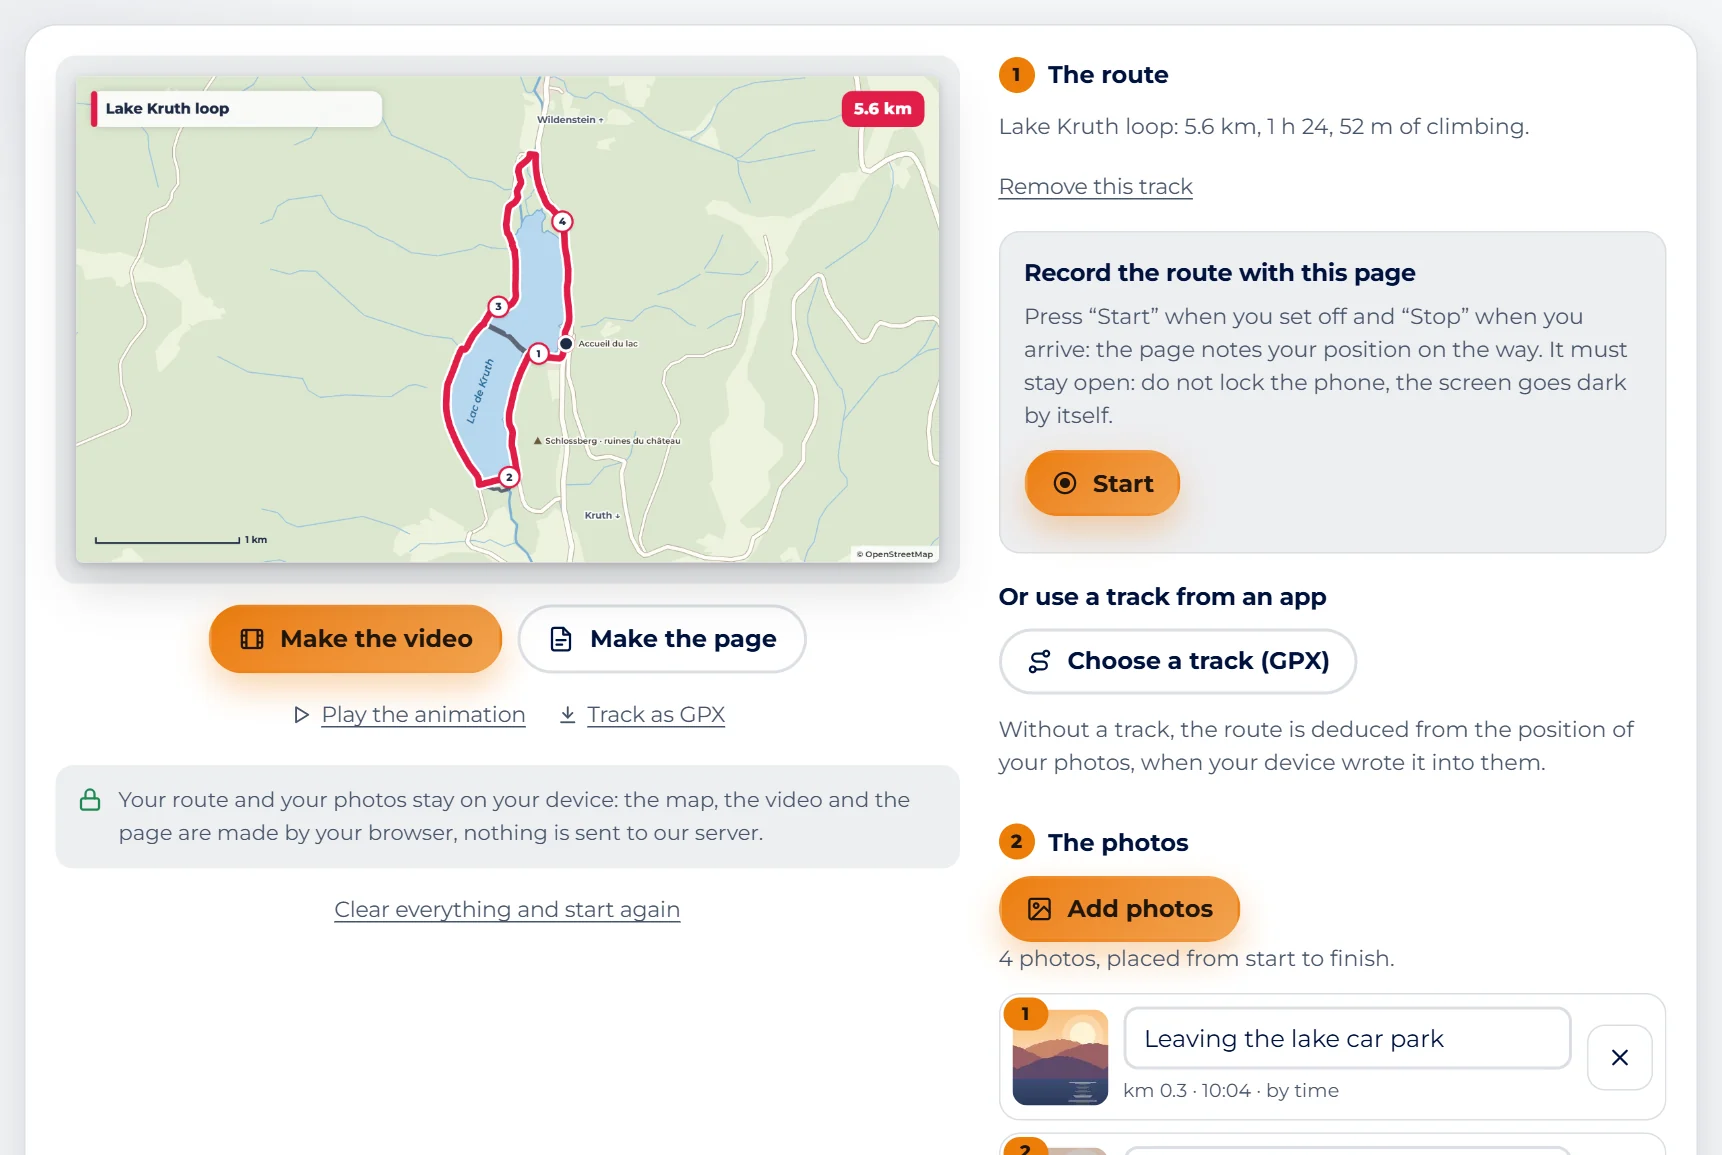
Screenshot : Trip journal TipIn our screenshot the outing goes round Lake Kruth-Wildenstein: for this area the tool draws the map itself. Elsewhere the route is shown on a plain background; the map background is ticked in the step “The look”.
Add your photos
- Go to the step The photos and tap Add photos.
- Choose those from the outing: up to 60.
- Each photo gets a number, from start to finish, and appears on the map.
- Under each one, a line gives the kilometre, the time and how it was placed: “by time”, “by position” or “in order”.
- In the field “Caption (optional)”, write a few words: they will show in the video and on the page.
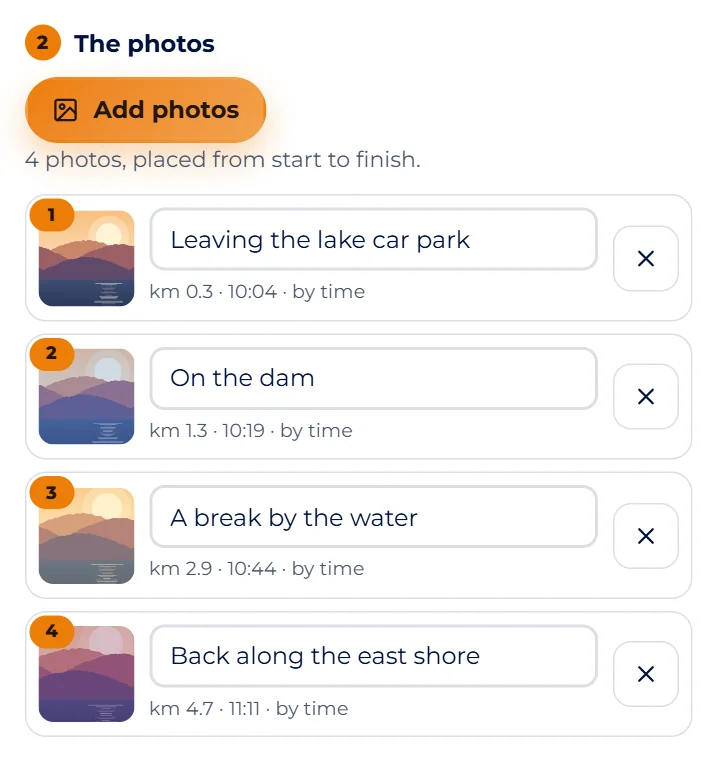
Screenshot : Trip journal TipOn Android, the photo picker often removes the position from pictures. That is not a problem: with a track, the time is enough.
Choose the look
- In the step The look, give your outing a Title and a Subtitle (the date is suggested), then a Route colour.
- The box Show the OpenStreetMap background adds roads, forests and villages under the route.
- Read the note under the box: it is the only moment when something is requested from outside.
Make the video
- In the last step, choose the format: Landscape for a screen, Portrait for phones, Square for social networks.
- Set the Time for each photo and, if you like, tick Add background music.
- Play the animation plays the film in the preview.
- Make the video records it: the page must stay on screen for the whole length of the film.
- Then Send the video opens your device's share sheet (WhatsApp, e-mail), and Download keeps the file.
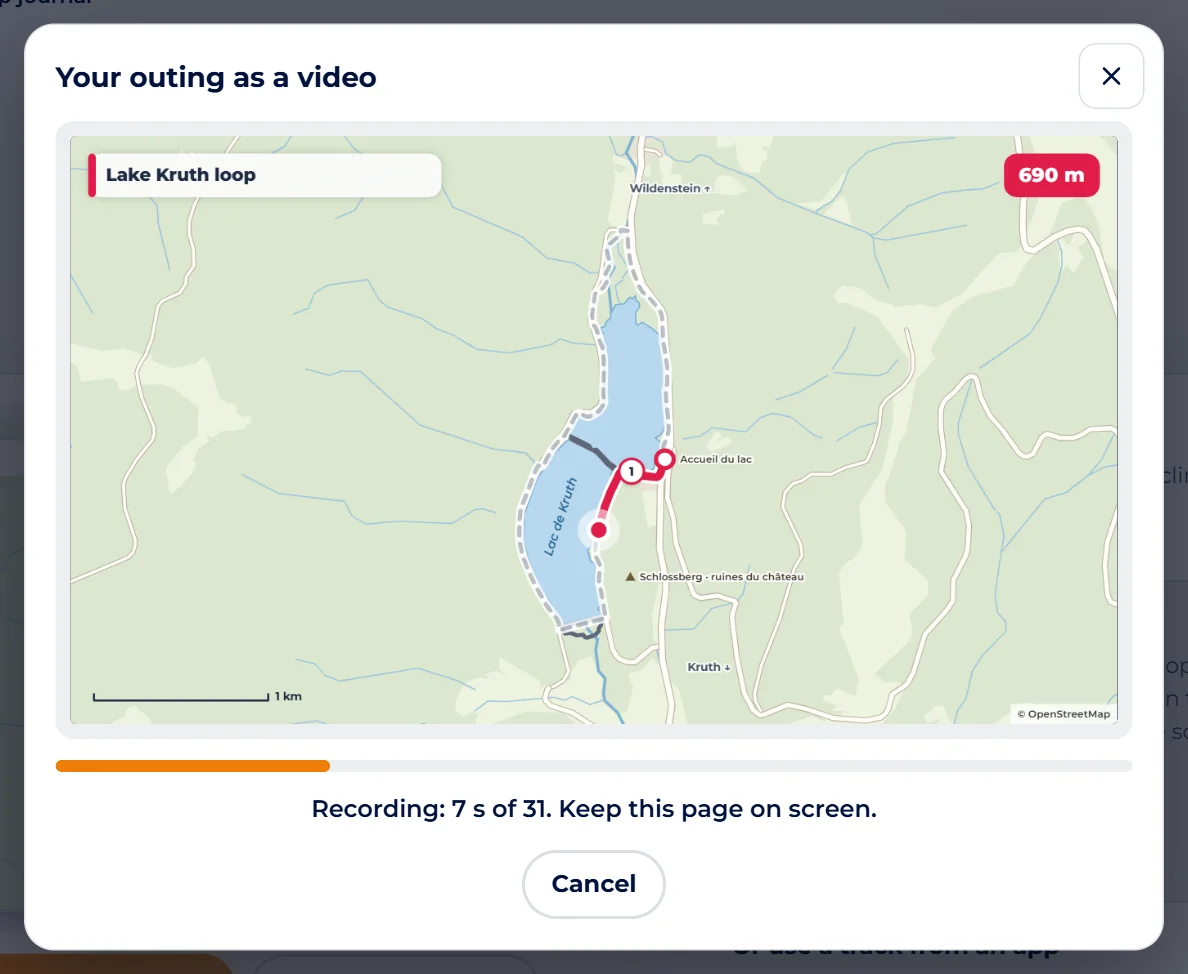
Screenshot : Trip journal TipThe tool tells you the length of the video before making it. Beyond three minutes, remove some photos or shorten their time: the file will be lighter to send.
Make and send the summary page
- Tap Make the page.
- The tool prepares a single file that contains the map, the figures of the outing, the elevation profile and your captioned photos.
- Three buttons appear: Send the page to share it, Download to keep it, Open to see it straight away.
- The file opens in any browser, even offline, and prints well.
- With one of your photos, you can also make a postcard of the outing.
All done: over to you.
Module 3
Three real-life situations
The walking club's outing
One member records the route with their usual app and exports the GPX. Back home, everyone sends them their best photos. As each photo carries its time, they line up along the route by themselves, whichever phone took them. The video goes to the club's group chat, and the summary page serves as a report.
The family holiday
Each outing gives a one-minute film: Portrait format, gentle music, two or three captions. The grandparents receive it by message and follow the route on the map. At the end of the stay, the summary pages printed as PDF make a real travel diary.
The holiday cottage or tourist office
To offer visitors a circuit, walk it once while recording. Take a photo at each point of interest and give it a caption: the fountain, the viewpoint, the picnic table. The summary page becomes a sheet to print or send to guests. For a version in your colours, published on your website, contact us.
Common mistakes
- Locking the phone or staying in another app for a long time while recording: the page no longer receives the position, and the route draws a straight line.
- Adding photos from another day: their time matches nothing in the track, so they are spread in order.
- Leaving the page while the video is being made: the recording stops and has to be started again.
- Counting on photos taken from the route screen for your gallery: they stay in the journal, at a reduced size.
- Sending the summary page without thinking: it shows your photos and the route, including the starting point.
The essentials
- A GPS track is a list of timed points; the GPX file lets you move it from one app to another.
- Photos are placed by their time: there is nothing to do by hand.
- The video is made in real time, with the page on screen; you then send it with your phone's share sheet.
- Nothing is sent to our server; only the optional map background comes from OpenStreetMap.
Test yourself
A few questions to check that everything is clear.